HOW TO MAKE
CARDBOARD VENTILATION UNIT
This guide is part of:
Welcome to the website guide of the Eket V2 build video guide.
With two separate chambers this build can do continuous supply in a very small package.
This guide is done with a small and a big eket, but you could do it with two large ones to allow longer vegging, in this case you can do the second eket for vegging with just 2 panels instead of 4.
The normal power usage for this build is below 50w total, which means less than $5/month for veg (4€) and $3/month in bloom (3€).
The new cardboard compression chamber of the blower allows for a quieter build and makes the carbon filter setup much simpler.
(The attachements below are also downloadable throughout the guide)
This is another "innovation" introduced in this build, previously we'd simply attach the blower to the back of the box, while relatively simple to do, it had a major problem: noise. Placing it inside helps a lot.
In this guide we'll show how to attach the blower inside the box, while taking as little space as possible 👌
What you'll need
Selected region:
World
Click to change
Blue Spot Soft Grip Precision Knife Set BY Blue Spot
From amazon.co.ukMake precise cuts; avoid your fingers
Great Tool For Trimming, Deburring Chiseling, Carving, Cutting and Other Hobby Craftwork;Hardened St
US$8.07
*price may vary *converted to local currencyUS$8.07
*price may vary *converted to local currencyHot Glue Gun BY TACKlife
From amazon.frSo anyway, I started blasting
Hot Melt Glue Gun is a tool for sticking Package That Can Be Used Easily,
Don't just come hobbies DI
US$13.24
*price may vary *converted to local currencyUS$13.24
*price may vary *converted to local currencyAluminium Tape BY Brackit
From amazon.co.ukSGL's favorite tape!
- Self-adhesive aluminium foil – 60 m conductive aluminium foil can be used in many ways in everyda
US$9.63
*price may vary *converted to local currencyUS$9.63
*price may vary *converted to local currencyTake side of small eket box
Take side of small eket box
It's now time to use the small eket carboard box you didn't destroy in step 1 ;)
Double side tape the 1st printed pattern
Double side tape the 1st printed pattern
Print the pattern and use double sided tape to stick it on the cardboard piece.
SGL's secret recipe for double sided tape:
cut a small piece of regular tape and join the 2 ends leaving the sticky part on the outside; voilá DIY double sided tape xD
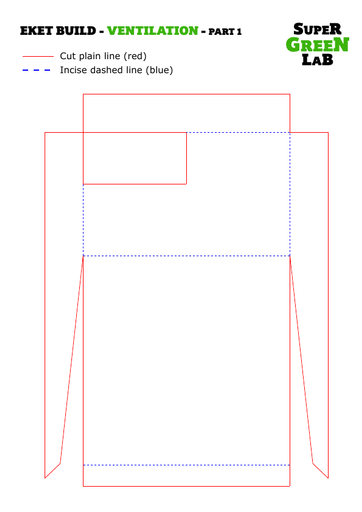 blower - pattern.pdf
Cut through plain lines
Cut through plain lines
Go ahead and cut through the plain lines.
Incise dashed lanes
Incise dashed lanes
DO NOT cut through dashed lines, only make an incision for easier bending.
Bend cardboard
Tape cardboard in place
Tape cardboard in place
Tape everything in place to give it it's final form.
Take the other side of the leftover cardboard box
Take the other side of the leftover cardboard box
Time to make the second part of the ventilation unit; grab the other side of the small eket carboard.
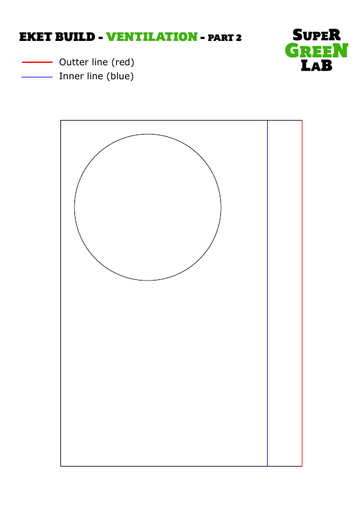 blower - pattern - 2.pdf
Double side tape the 2nd pattern
Double side tape the 2nd pattern
You know the drill; hold everything in place with double sided tape.
Cut inner blue line
Cut inner blue line
Cut the inner blue line.
Keep the strip to avoid reprinting the pattern later.
Cut out the circle shape
Cut out the circle shape
Cut out the circle which will be the exhaust of the unit & separate the carboard pieces.
Keep the pattern to avoid having to reprint it later.
Attach part 1 & 2 together
Attach part 1 & 2 together
It's easier if you hold them in place with a small piece of tape first.
Seal the ventilation unit with aluminium tape
Seal the ventilation unit with aluminium tape
The final touch is sealing both parts together with aluminium tape.
Glue blower to cardboard
Glue blower to cardboard
Gluing the blower to the cardboard is the last step; make sure it seals well all around.
Next
Ok, the ventilation unit is made; here's how to** install it and the carbon filter too!**