HOW TO INSTALL
CARDBOARD VENTILATION UNIT
This guide is part of:
Welcome to the website guide of the Eket V2 build video guide.
With two separate chambers this build can do continuous supply in a very small package.
This guide is done with a small and a big eket, but you could do it with two large ones to allow longer vegging, in this case you can do the second eket for vegging with just 2 panels instead of 4.
The normal power usage for this build is below 50w total, which means less than $5/month for veg (4€) and $3/month in bloom (3€).
The new cardboard compression chamber of the blower allows for a quieter build and makes the carbon filter setup much simpler.
(The attachements below are also downloadable throughout the guide)
Ok, the ventilation unit is made; here's how to** install it and the carbon filter too!**
What you'll need
Selected region:
World
Click to change
Hot Glue Gun BY TACKlife
From amazon.frSo anyway, I started blasting
Hot Melt Glue Gun is a tool for sticking Package That Can Be Used Easily,
Don't just come hobbies DI
US$13.24
*price may vary *converted to local currencyUS$13.24
*price may vary *converted to local currency3M 9019 General Purpose Sandpaper Sheets BY 3M
From amazon.comRoughing up a surface for better adhesiveness
3M™ General Purpose Sandpaper comes in a variety of minerals and a wide grit range. Ideal for painte
US$3.17
*price may varyUS$3.17
*price may vary3-in-1 Air Filter Replacement BY Nispira
From amazon.comSimple and efficient
- Premium 3-in-1 air filter replacement set compatible with Vornado Air Purifier CYLO50, CYLO51, and
US$13.99
*price may varyUS$13.99
*price may varyPrint cardboard blower pattern
Print cardboard blower pattern
You'll need the pattern again this time with the offset (remember the piece you cut off?)
You can also reuse the first pattern by taping back the previously cut strip if you kept it :)
 blower - pattern - 2.pdf
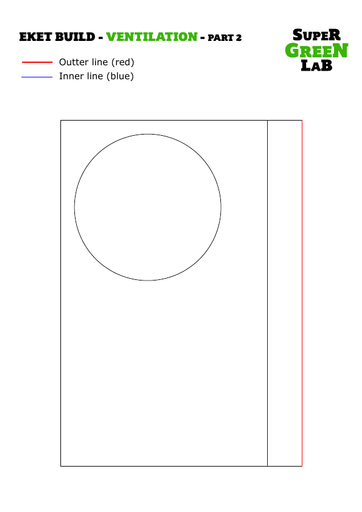
Cut outer line
Cut outer line
This time cut around the outer line (red line); this is the offset to place the ventilation unit correctly.
You can also reuse the first pattern by taping back the previously cut strip if you kept it :)
Apply double sided tape
Apply double sided tape
By now I'm sure you've got this!
It's double sided tape time!
Stick the pattern inside on the top right corner backwall
Stick the pattern inside on the top right corner backwall
That's where the blower will be 👌
If you check behind you'll see why there's an offset.
Mark the placement pattern with a pencil
Mark the placement pattern with a pencil
This will help you place the ventilation unit in the correct spot.
Drill exhaust hole(s) 1/2
Drill exhaust hole(s) 1/2
There are a couple methods to do this:
if you don't have a hole saw to make a big hole; you can drill many smaller holes.
Drill exhaust hole(s) 2/2
Drill exhaust hole(s) 2/2
Using a hole saw is a bit scarier but the result is much cleaner.
Drill intake holes
Drill intake holes
Drill a couple holes in the lower back corners for fresh air intake.
For a small space like the eket making holes is enough for the intake; it doesn't need active intake.
Glue intake dust filter
Glue intake dust filter
It's an optional step but helps prevent dust and pests from getting in there.
Best use black for added light proofing.
Pass the blower and sensor cables through the top right cable hole
Pass the blower and sensor cables through the top right cable hole
It's indeed much simpler to do it before attaching the blower like we did.
A dull end object like the butt of a pencil is a good tool to help push.
Glue ventilation unit
Glue ventilation unit
Start by sanding the surface a bit, then place the ventilation unit on the marks you traced previously.
Make sure to put glue all around the exhaust hole for a good seal** 👌**
Glue carbon filter
Glue carbon filter
Glue the carbon filter on the back of the cabinet on top of the exhaust hole.
Make sure to glue all around it to avoid leaks.
Next
Now is the time to put a brain in the box!
First purpose of the controller is to setup lighting schedules to simulate sunrise and sunset at the right time, and control your plants' phase.
Because keeping an eye on temperature and humidity is important for optimal growth, the controller sends all the info to the app for on-the-go monitoring.