HOW TO BUILD
VERTICAL CARDBOARD LED HOLDER
This guide is part of:
Welcome to the website guide of the Eket V2 build video guide.
With two separate chambers this build can do continuous supply in a very small package.
This guide is done with a small and a big eket, but you could do it with two large ones to allow longer vegging, in this case you can do the second eket for vegging with just 2 panels instead of 4.
The normal power usage for this build is below 50w total, which means less than $5/month for veg (4€) and $3/month in bloom (3€).
The new cardboard compression chamber of the blower allows for a quieter build and makes the carbon filter setup much simpler.
(The attachements below are also downloadable throughout the guide)
This is actually one of the most important part of this build, the main problem being to be able to place the led panels diagonally in the box, so the plant has more room to grow.
Another advantage of this way of doing, is that the cardboard structure exposes the back of the panels inside the cardboard tubes, instead of directly in the box, which helps evacuating hot air directly to the top of the box, without spreading to the rest of the box.
What you'll need
Selected region:
World
Click to change
Aluminium Tape BY Brackit
From amazon.co.ukSGL's favorite tape!
- Self-adhesive aluminium foil – 60 m conductive aluminium foil can be used in many ways in everyda
US$9.63
*price may vary *converted to local currencyUS$9.63
*price may vary *converted to local currencyBlue Spot Soft Grip Precision Knife Set BY Blue Spot
From amazon.co.ukMake precise cuts; avoid your fingers
Great Tool For Trimming, Deburring Chiseling, Carving, Cutting and Other Hobby Craftwork;Hardened St
US$8.07
*price may vary *converted to local currencyUS$8.07
*price may vary *converted to local currency#2 HB Pencil BY Amazon Basics
From amazon.co.ukHB, 2b, LGBT, we love all pencils ✏
#2 HB pencils made from high-quality wood come presharpened
US$5.20
*price may vary *converted to local currencyUS$5.20
*price may vary *converted to local currency12 inch plastic ruler BY eboot
From amazon.comThe tool to measure and draw straight lines
- Wide application: a useful measuring tool for artists, designers, architects, engineers, students
US$5.99
*price may varyUS$5.99
*price may varySGL 36 lm301b BY SuperGreenTomato
From SuperGreenTomato EUEfficient lights in a small package
We worked hard on innovation so that the setup process couldn’t be easier for you :
- Mount on your
US$27.58
*converted to local currencyUS$27.58
*converted to local currencyHot Glue Gun BY TACKlife
From amazon.frSo anyway, I started blasting
Hot Melt Glue Gun is a tool for sticking Package That Can Be Used Easily,
Don't just come hobbies DI
US$13.24
*price may vary *converted to local currencyUS$13.24
*price may vary *converted to local currencyBuilding the LED holders
Building the LED holders
Hopefully you followed the first step properly and didn’t destroy the cardboard box.
Take the cardboard from the large eket; we’re going to start by making the LED holders.
You can cut off the flap part and keep the main rectangle.
With this we're going to make the LED holders.
Trace the lines
Trace the lines
For this new and improved how to build guide we made some printable plans and patterns; click the attachements below to download them.
Start by tracing the lines on the cardboard.
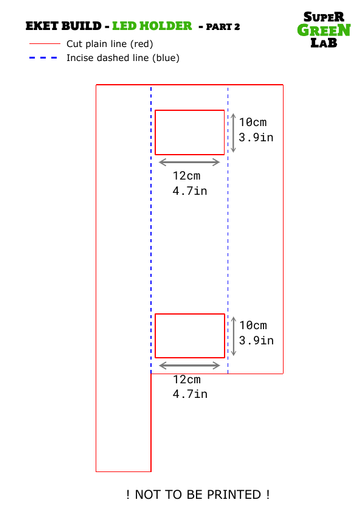 led - holder - 2.pdf
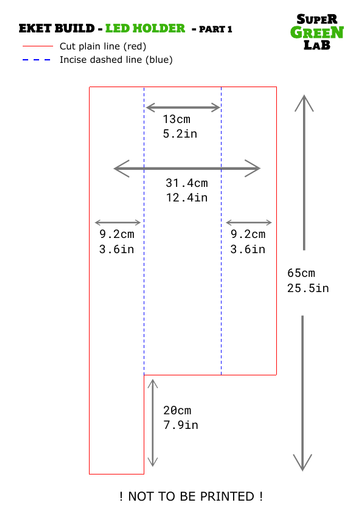 led - holder.pdf
Using the door for reference works too
Using the door for reference works too
For a simple way to measure the height of the LED holder, place it against the door and draw a line at the top.
Remove a little gap at the top
Remove a little gap at the top
As the air behind the LED heats and rises; cutting a bit shorter from the top will allow air to escape and be directly exhausted.
Make the LED placer
Make the LED placer
The top of the cardboard cut out previously can be used to help you place the LED panels.
Cut off one side, it has the perfect shape for marking where the LED panel will go.
Mark LED position
Mark LED position
The top piece you just cut off can be used as a guide to mark the LED spot - or use the measures from the previous PDFs
Cut out the LED shaped rectangle
Cut out the LED shaped rectangle
By freeing the back of the LED panel we’re helping with heat dissipation (even though these panels produce very little it's better to do it than not :)).
Make the incision alond the dashed lines
Make the incision alond the dashed lines
Deep breath, steady hands - here the goal is to make an incision (don’t cut through) on the outer layer making it easier to bend.
Bend cardboard
Secure hinge with aluminium tape
Secure hinge with aluminium tape
Secure the hinge with some aluminium tape to prevent ripping and cover the front of the holder for increased light reflection.
Attach LED to holder 1/2
Attach LED to holder 1/2
When inspiration struck we went with the flow and created these little LED holders which are quite practical.
Stacking and gluing 2 pieces of cardboard to make a little notch holder.
Attach LED to holder 2/2
Attach LED to holder 2/2
But on the other hand just taping the LED panels is simpler and faster.
+you can easily clean off the tape residue with iso.
Yes, the GIF shows the holder for the veg box but I'm sure you understand the concept :)
Make holes for cable management
Make holes for cable management
For cable management purposes we’ll have the lower panel cable inside the structure.
Imprint the shape of the connector and cut out the cardboard.
Now put the cable inside and out the top.
Place the LED panels
Place the LED panels
Plug the LED panels and hold everything in place with a piece of aluminium tape.
Close LED holder
Close LED holder
Last step for the LED holder build; close the back with tape.
Make sure you have both ends of the LED cables out the top.
Next
Now that our cardboard structure is made and our led panels are attached to it, it's time to place the LED holders inside the growbox!